1. 理论基础
1.1 分布式文件系统出现
计算机通过文件系统管理、存储数据,而现在数据信息爆炸的时代中人们可以获取的数据成指数倍的增长,单纯通过增加硬盘个数来扩展计算机文件系统的存储容量的方式,已经不能满足目前的需求。
分布式文件系统可以有效解决数据的存储和管理难题,将固定于某个地点的某个文件系统,扩展到任意多个地点、多个文件系统,众多的节点组成一个文件系统网络。每个节点可以分布在不同的地点,通过网络进行节点间的通信和数据传输。人们在使用分布式文件系统时,无需关心数据是存储在哪个节点上、或者是从哪个节点获取的,只需要像使用本地文件系统一样管理和存储文件系统中的数据。
1.2 典型代表 NFS
NFS(Network File System) 即网络文件系统,它允许从网络中的计算机之间通过 TCP/IP 网络共享资源。在 NFS 的应用中,本地 NFS 的客户端应用可以透明地读写位于远端 NFS 服务器上的文件,就像访问本地文件一样。NFS 的优点如下:
节约使用磁盘空间
客户端经常使用的数据可以集中存放在一台机器上,并使用 NFS 发布,那么网络内的所有计算机可以通过网络访问,不必单独存储。
节约硬件资源
NFS 还可以共享软驱,CD-ROM 等存储设备,减少整个网络上的可移动设备数量。
用户主目录设定
对于特殊用户,如管理员等,为了管理的需要,可能会经常登录到网络中所有的计算机,若每个客户端,均保存这个用户的主目录很繁琐,而且不能保证数据的一致性。实际上,经过 NFS 服务的设定,然后在客户端指定这个用户的主目录位置,并自动挂载,就可以在任何计算机上使用用户主目录的文件。
1.3 NFS 面临的问题
- 存储空间不足,需要更大容量的存储
- 直接用 NFS 挂载存储,有一定的风险,存在单点故障
- 某些场景不能满足要求,大量的访问下磁盘 IO 是瓶颈
1.4 GlusterFS 概述
A STORAGE PLATFORM FOR PHYSICAL, VIRTUAL, AND CLOUD ENVIRONMENTS
Red Hat® Gluster Storage is an open, software-defined scale-out storage platform.
Use it to easily manage unstructured data for physical, virtual, and cloud environments.
Red Hat Gluster Storage combines both file and object storage with a scale-out architecture, designed to cost-effectively store and
manage petabyte-scale data growth. It delivers a continuous storage fabric across physical, virtual, and cloud resources,
which lets you transform your big, semi-structured, and unstructured data from a burden to an asset.
GlusterFS 是 Scale-Out 存储解决方案 Gluster 的核心,它是一个开源的分布式文件系统,具有强大的横向扩展能力,通过扩展能够支持数 PB 存储容量和处理数千客户端。 GlusterFS 借助 TCP/IP 或 InfiniBand RDMA 网络将物理分布的存储资源聚集在一起,使用单一全局命名空间来管理数据。GlusterFS 基于可堆叠的用户空间设计,可为各种不同的数据负载提供优异的性能。
GlusterFS 支持运行在任何 IP 网络上的标准应用程序的标准客户端,用户可以在全局统一的命名空间中使用 NFS/CIFS 等标准协议来访问应用数据。GlusterFS 使得用户可摆脱原有的独立、高成本的封闭存储系统,能够利用普通廉价的存储设备来部署可集中管理、横向扩展、虚拟化的存储池,存储容量可扩展至 TB/PB 级。
目前 GlusterFS 已被 Red Hat 收购,它的官网是:http://www.gluster.org/
1.5 企业中的应用场景
理论和实践上分析,GlusterFS 目前主要适用于大文件存储场景,对于小文件尤其是海量小文件,存储效率和访问性能都表现不佳。海量小文件 LOSF 问题是工业界和学术界公认的难题,GlusterFS 作为通用的分布式文件系统,并没有对小文件作额外的优化措施,性能不好也是可以理解的。
STORE VARIOUS KINDS OF UNSTRUCTURED DATA:
* Rich media content like videos, images and audio files
* Backup-images and Nearline archives
* Big data — Log files, RFID data, and other machine-generated data
* Virtual machine images
- Media - 文档、图片、音频、视频
- Shared storage - 云存储、虚拟化存储、HPC(高性能计算)
- Big data - 日志文件、RFID(射频识别)数据
文件大小大于 1MB 适合 GlusterFS,如果更小可以选用其他文件系统,如 FastFS 等,或者配置 CDN。
2. 部署安装
2.1 GlusterFS 安装前的准备
服务器规划(采用 VMware Workstation 虚拟机环境)
| 操作系统 | IP | 主机名 | 数据盘(2 块) |
|---|---|---|---|
| CentOS 6.8 x86_64 | 192.168.56.11 | mystorage1 | sdb:10G sdc:10G |
| CentOS 6.8 x86_64 | 192.168.56.12 | mystorage2 | sdb:10G sdc:10G |
| CentOS 6.8 x86_64 | 192.168.56.13 | mystorage3 | sdb:10G sdc:10G |
| CentOS 6.8 x86_64 | 192.168.56.14 | mystorage4 | sdb:10G sdc:10G |
2.2 GlusterFS 安装
2.2.1 修改主机名
修改:/etc/sysconfig/network
分别在各台服务器上执行 hostname 临时生效,不用重启
2.2.2 添加 hosts 文件实现集群主机之间相互能够解析1
2
3
4echo '192.168.56.11 mystorage1
192.168.56.12 mystorage2
192.168.56.13 mystorage3
192.168.56.14 mystorage4' >> /etc/hosts
2.2.3 关闭 SELinux 和 防火墙1
2
3
4
5sed -i 's#SELINUX=enforcing#SELINUX=disabled#' /etc/selinux/config
/etc/init.d/iptables stop
# 检查
getenforce
/etc/init.d/iptables status
2.2.4 安装 EPEL 源
GlusterFS yum 源有部分包依赖 epel 源1
yum install epel-release -y
2.2.5 安装 GlusterFS 源及相关软件包1
2
3
4
5
6
7
8
9
10
11
12
13
14yum install centos-release-gluster37.noarch -y
yum --enablerepo=centos-gluster*-test install glusterfs-server glusterfs-cli glusterfs-geo-replication -y
# 安装完成后的包
rpm -qa | grep gluster*
centos-release-gluster37-1.0-4.el6.centos.noarch
glusterfs-api-3.7.13-1.el6.x86_64
glusterfs-3.7.13-1.el6.x86_64
glusterfs-client-xlators-3.7.13-1.el6.x86_64
glusterfs-fuse-3.7.13-1.el6.x86_64
glusterfs-server-3.7.13-1.el6.x86_64
glusterfs-libs-3.7.13-1.el6.x86_64
glusterfs-cli-3.7.13-1.el6.x86_64
glusterfs-geo-replication-3.7.13-1.el6.x86_64
2.3 配置 GlusterFS
2.3.1 查看 GlusterFS 版本信息
使用 glusterfs -V 命令1
2
3
4
5
6
7
8
9[root@mystorage1 ~]# glusterfs -V
glusterfs 3.7.13 built on Jul 8 2016 15:25:47
Repository revision: git://git.gluster.com/glusterfs.git
Copyright (c) 2006-2013 Red Hat, Inc. <http://www.redhat.com/>
GlusterFS comes with ABSOLUTELY NO WARRANTY.
It is licensed to you under your choice of the GNU Lesser
General Public License, version 3 or any later version (LGPLv3
or later), or the GNU General Public License, version 2 (GPLv2),
in all cases as published by the Free Software Foundation.
2.3.2 启动、停止服务
1 | /etc/init.d/glusterd start |
在 4 台服务器上都执行
2.3.3 存储主机加入信任主机池
在一台主机上执行,将其他主机加入,如下是在 mystorage1 上执行1
2
3
4
5
6[root@mystorage1 ~]# gluster peer probe mystorage2
peer probe: success.
[root@mystorage1 ~]# gluster peer probe mystorage3
peer probe: success.
[root@mystorage1 ~]# gluster peer probe mystorage4
peer probe: success.
2.3.4 查看状态
在另外的机器查看状态:1
2
3
4
5
6
7
8
9
10
11
12
13
14[root@mystorage2 ~]# gluster peer status
Number of Peers: 3
Hostname: mystorage1
Uuid: 6e6a84af-ac7a-44eb-85c9-50f1f46acef1
State: Peer in Cluster (Connected)
Hostname: mystorage3
Uuid: 36e4c45c-466f-47b0-b829-dcd4a69ca2e7
State: Peer in Cluster (Connected)
Hostname: mystorage4
Uuid: c607f6c2-bdcb-4768-bc82-4bc2243b1b7a
State: Peer in Cluster (Connected)
2.3.5 配置前的准备工作
安装 xfs 支持包1
yum install xfsprogs -y
fdisk -l 查看磁盘设备,确认新加的数据盘在线1
2
3
4如果磁盘大于 4T 的话就用 parted 来分区,这里我们不会用分区(可以不分区)
做分布式文件系统的时候数据盘一般不需要做 RAID,一般系统盘会做 RAID 1
如果磁盘有 RAID 卡(cache),最好用上(RAID 5)
也可以在单机做了 RAID 5 的基础上,再用 glusterfs 做成一个大的文件系统
格式化创建文件系统1
mkfs.xfs -f /dev/sdb
在四台机器上创建挂载块设备的目录,挂载硬盘到目录:1
2
3mkdir -p /storage/brick1 /storage/brick2
mount /dev/sdb /storage/brick1
df -h
加入到 /etc/fstab1
2echo “/dev/sdb /storage/brick1 xfs defaults 0 0” » /etc/fstab
mount -a
2.3.6 创建 volume 及其他操作
GlusterFS 五种卷
- Distributed:分布式卷,文件通过 hash 算法随机分布到由 bricks 组成的卷上。
- Replicated: 复制式卷,类似 RAID 1,replica 数必须等于 volume 中 brick 所包含的存储服务器数,可用性高。
- Striped: 条带式卷,类似 RAID 0,stripe 数必须等于 volume 中 brick 所包含的存储服务器数,文件被分成数据块,以 Round Robin 的方式存储在 bricks 中,并发粒度是数据块,大文件性能好。
- Distributed Striped: 分布式的条带卷,volume中 brick 所包含的存储服务器数必须是 stripe 的倍数(>=2倍),兼顾分布式和条带式的功能。
- Distributed Replicated: 分布式的复制卷,volume 中 brick 所包含的存储服务器数必须是 replica 的倍数(>=2倍),兼顾分布式和复制式的功能。
- glustfs 最常用的卷就是分布式复制卷。
- striped 的目的就提高性能,读取更快。
企业一般用后两种,大部分会用分布式复制(可用容量为 总容量/复制份数),通过网络传输的话最好用万兆交换机,万兆网卡来做。这样就会优化一部分性能。它们的数据都是通过网络来传输的。
分布式卷1
2
3
4
5
6
7
8
9
10
11
12
13
14
15
16
17
18
19
20
21
22
23
24
25
26
27
28
29
30
31
32
33
34
35
36
37
38
39
40
41
42
43
44
45
46
47
48
49
50
51
52
53
54
55
56
57# 创建分布式卷
[root@mystorage1 ~]# gluster volume create gv1 mystorage1:/storage/brick1 mystorage2:/storage/brick1 force
volume create: gv1: success: please start the volume to access data
# 启动创建的卷
[root@mystorage1 ~]# gluster volume start gv1
volume start: gv1: success
# 在另一台机器(mystorage4)查看卷信息
[root@mystorage4 ~]# gluster volume info
Volume Name: gv1
Type: Distribute
Volume ID: b6ec2f8a-d1f0-4d1b-806b-238efb6dcb84
Status: Started
Number of Bricks: 2
Transport-type: tcp
Bricks:
Brick1: mystorage1:/storage/brick1
Brick2: mystorage2:/storage/brick1
Options Reconfigured:
performance.readdir-ahead: on
# 挂载卷到目录
[root@mystorage4 ~]# mount -t glusterfs 127.0.0.1:/gv1 /mnt
[root@mystorage4 ~]# df -h
Filesystem Size Used Avail Use% Mounted on
/dev/sda3 33G 1.3G 30G 5% /
tmpfs 242M 0 242M 0% /dev/shm
/dev/sda1 976M 38M 888M 5% /boot
/dev/sdb 10G 33M 10G 1% /storage/brick1
127.0.0.1:/gv1 20G 65M 20G 1% /mnt
# 在 mystorage1 创建测试文件
[root@mystorage1 ~]# touch /mnt/{a..d}
[root@mystorage1 ~]# ll /mnt
total 0
-rw-r--r-- 1 root root 0 Jul 30 00:54 a
-rw-r--r-- 1 root root 0 Jul 30 00:54 b
-rw-r--r-- 1 root root 0 Jul 30 00:54 c
-rw-r--r-- 1 root root 0 Jul 30 00:54 d
# 在 mystorage4 也可看到新创建的文件,信任存储池中的每一台主机挂载这个卷后都可以看到
[root@mystorage4 ~]# ll /mnt/
total 0
-rw-r--r-- 1 root root 0 Jul 30 00:54 a
-rw-r--r-- 1 root root 0 Jul 30 00:54 b
-rw-r--r-- 1 root root 0 Jul 30 00:54 c
-rw-r--r-- 1 root root 0 Jul 30 00:54 d
# 文件实际存在位置
[root@mystorage1 ~]# ls /storage/brick1
a b c e
[root@mystorage2 ~]# ls /storage/brick1
d
# 上面可以看到文件根据 hash 算法随机分布到由不同的 brick 上
使用 NFS 方式挂载1
2
3
4
5
6
7
8
9
10
11
12
13
14
15
16[root@mystorage3 ~]# mount -o mountproto=tcp -t nfs mystorage1:/gv1 /mnt/ # host可以写主机名
[root@mystorage3 ~]# ll /mnt
total 0
-rw-r--r-- 1 root root 0 Jul 30 00:54 a
-rw-r--r-- 1 root root 0 Jul 30 00:54 b
-rw-r--r-- 1 root root 0 Jul 30 00:54 c
-rw-r--r-- 1 root root 0 Jul 30 00:54 d
[root@mystorage2 ~]# mount -o mountproto=tcp -t nfs 192.168.56.13:/gv1 /mnt/
# host 可以写 IP,可以看到这个 mystorage3 的 IP,说明 gv1 是共享给信任存储池的所有主机的
[root@mystorage2 ~]# ll /mnt/
total 0
-rw-r--r-- 1 root root 0 Jul 30 00:54 a
-rw-r--r-- 1 root root 0 Jul 30 00:54 b
-rw-r--r-- 1 root root 0 Jul 30 00:54 c
-rw-r--r-- 1 root root 0 Jul 30 00:54 d
复制式卷1
2
3
4
5
6
7
8
9
10
11
12
13
14
15
16
17
18
19
20
21
22
23
24
25
26
27
28
29
30
31
32
33
34
35
36
37
38
39
40
41
42
43
44
45# 创建复制式卷
[root@mystorage1 ~]# gluster volume create gv2 replica 2 mystorage3:/storage/brick1 mystorage4:/storage/brick1 force
volume create: gv2: success: please start the volume to access data
# 启动创建的卷
[root@mystorage1 ~]# gluster volume start gv2
volume start: gv2: success
# 查看卷信息
[root@mystorage1 ~]# gluster volume info gv2
Volume Name: gv2
Type: Replicate
Volume ID: 11928696-263a-4c7a-a155-5115af29221f
Status: Started
Number of Bricks: 1 x 2 = 2
Transport-type: tcp
Bricks:
Brick1: mystorage3:/storage/brick1
Brick2: mystorage4:/storage/brick1
Options Reconfigured:
performance.readdir-ahead: on
# 挂载卷到目录,创建测试文件
[root@mystorage1 ~]# mount -t glusterfs 127.0.0.1:/gv2 /opt
[root@mystorage1 ~]# touch /opt/{a..d}
[root@mystorage1 ~]# ls /opt
a b c d
# 在 mystorage3,4 可看到新创建的文件
[root@mystorage3 ~]# mount -t glusterfs 127.0.0.1:/gv2 /opt
[root@mystorage3 ~]# ls /opt/
a b c d
[root@mystorage4 ~]# mount -t glusterfs 127.0.0.1:/gv2 /opt
[root@mystorage4 ~]# ls /opt/
a b c d
# 文件实际存在位置
[root@mystorage3 ~]# ls /storage/brick1
a b c d
[root@mystorage4 ~]# ls /storage/brick1
a b c d
# 上面可以看到文件根据在 2 台机器上的 brick 上都有
格式化挂载第二块硬盘1
2
3
4
5mkfs.xfs -f /dev/sdc
mkdir -p /storage/brick2
echo "/dev/sdc /storage/brick2 xfs defaults 0 0" >> /etc/fstab
mount -a
df -h
分布式条带卷1
2
3
4
5
6
7
8
9
10
11
12
13
14
15
16
17
18
19
20
21
22
23
24
25
26
27
28
29
30
31
32
33
34
35
36
37
38
39
40
41
42
43
44
45
46
47
48# 创建分布式条带卷
[root@mystorage1 ~]# gluster volume create gv3 stripe 2 mystorage3:/storage/brick2 mystorage4:/storage/brick2 force
volume create: gv3: success: please start the volume to access data
# 启动创建的卷
[root@mystorage1 ~]# gluster volume start gv3
volume start: gv3: success
# 查看卷信息
[root@mystorage1 ~]# gluster volume info gv3
Volume Name: gv3
Type: Stripe
Volume ID: 2871801f-b125-465c-be3a-4eeb2fb44916
Status: Started
Number of Bricks: 1 x 2 = 2
Transport-type: tcp
Bricks:
Brick1: mystorage3:/storage/brick2
Brick2: mystorage4:/storage/brick2
Options Reconfigured:
performance.readdir-ahead: on
# 挂载卷到目录,创建测试文件
mkdir /gv3
mount -t glusterfs 127.0.0.1:gv3 /gv3
df -h
dd if=/dev/zero bs=1024 count=10000 of=/gv3/10M.file
dd if=/dev/zero bs=1024 count=20000 of=/gv3/20M.file
# 查看新创建的文件
[root@mystorage1 ~]# ll /gv3/
total 30000
-rw-r--r-- 1 root root 10240000 Jul 30 02:26 10M.file
-rw-r--r-- 1 root root 20480000 Jul 30 02:26 20M.file
# 文件实际存放位置
[root@mystorage3 ~]# ll -h /storage/brick2/
total 15M
-rw-r--r-- 2 root root 4.9M Jul 30 02:26 10M.file
-rw-r--r-- 2 root root 9.8M Jul 30 02:26 20M.file
[root@mystorage4 ~]# ll -h /storage/brick2/
total 15M
-rw-r--r-- 2 root root 4.9M Jul 30 02:25 10M.file
-rw-r--r-- 2 root root 9.8M Jul 30 02:26 20M.file
# 上面可以看到 10M 20M 的文件分别分成了 2 块(这是条带的特点),每块又分别在同的 brick 下(这是分布式的特点)
分布式复制卷1
2
3
4
5
6
7
8
9
10
11
12
13
14
15
16
17
18
19
20
21
22
23
24
25
26
27
28
29
30
31
32
33
34
35
36
37
38
39
40
41
42
43
44# 查看复制式卷的效果
cd /gv2
rm -f *
dd if=/dev/zero bs=1024 count=10000 of=/gv2/10M.file
dd if=/dev/zero bs=1024 count=20000 of=/gv2/20M.file
dd if=/dev/zero bs=1024 count=30000 of=/gv2/30M.file
[root@mystorage3 ~]# ll -h /storage/brick1/
total 59M
-rw-r--r-- 2 root root 9.8M Jul 30 02:41 10M.file
-rw-r--r-- 2 root root 20M Jul 30 02:41 20M.file
-rw-r--r-- 2 root root 30M Jul 30 02:41 30M.file
[root@mystorage4 ~]# ll -h /storage/brick1
total 59M
-rw-r--r-- 2 root root 9.8M Jul 30 02:40 10M.file
-rw-r--r-- 2 root root 20M Jul 30 02:40 20M.file
-rw-r--r-- 2 root root 30M Jul 30 02:40 30M.file
# gv2 添加 brick 进行扩容
[root@mystorage1 ~]# gluster volume stop gv2
Stopping volume will make its data inaccessible. Do you want to continue? (y/n) y
[root@mystorage1 ~]# gluster volume add-brick gv2 replica 2 mystorage1:/storage/brick2 mystorage2:/storage/brick2 force
volume add-brick: success
[root@mystorage1 ~]# gluster volume start gv2
volume start: gv2: success
[root@mystorage1 ~]# gluster volume info gv2
Volume Name: gv2
Type: Distributed-Replicate # 这里显示是分布式复制卷,是在 gv2 复制卷的基础上增加 2 块 brick 形成的
Volume ID: 11928696-263a-4c7a-a155-5115af29221f
Status: Stopped
Number of Bricks: 2 x 2 = 4
Transport-type: tcp
Bricks:
Brick1: mystorage3:/storage/brick1
Brick2: mystorage4:/storage/brick1
Brick3: mystorage1:/storage/brick2
Brick4: mystorage2:/storage/brick2
Options Reconfigured:
performance.readdir-ahead: on
注意:当你给分布式复制卷和分布式条带卷增加 bricks 时,你增加的 bricks 数目必须是复制或条带数目的倍数,例如:你给一个分布式复制卷的 replica 为 2,你在增加 bricks 的时候数量必须为2、4、6、8等。 扩容后进行测试,发现文件都分布在扩容前的卷中。
磁盘存储的平衡
注意:平衡布局是很有必要的,因为布局结构是静态的,当新的 bricks 加入现有卷,新创建的文件会分布到旧的 bricks 中,所以需要平衡布局结构,使新加入的 bricks 生效。布局平衡只是使新布局生效,并不会在新的布局中移动老的数据,如果你想在新布局生效后,重新平衡卷中的数据,还需要对卷中的数据进行平衡。
1 | # 再在 /gv2 下创建 2 个新的文件 10M.file1 20M.file1 |
每做一次扩容后都需要做一次磁盘平衡。 磁盘平衡是在万不得已的情况下再做的,一般再创建一个卷就可以了。
移除 brick
你可能想在线缩小卷的大小,例如:当硬件损坏或网络故障的时候,你可能想在卷中移除相关的 bricks。
注意:当你移除 bricks 的时候,你在 gluster 的挂载点将不能继续访问数据,只有配置文件中的信息移除后你才能继续访问 bricks 中的数据。当移除分布式复制卷或者分布式条带卷的时候,移除的 bricks 数目必须是 replica 或者 stripe 的倍数。
例如:一个分布式条带卷的 stripe 是 2,当你移除 bricks 的时候必须是 2、4、6、8 等。1
2
3
4
5
6
7
8
9
10
11
12
13
14
15
16
17
18
19
20
21
22
23
24
25
26
27
28
29
30
31
32
33
34
35
36
37
38
39
40
41
42
43
44
45# 下面移除 gv2 卷的 2 个 bricks
[root@mystorage1 ~]# gluster volume stop gv2
Stopping volume will make its data inaccessible. Do you want to continue? (y/n) y
volume stop: gv2: success
[root@mystorage1 ~]# gluster volume remove-brick gv2 replica 2 mystorage3:/storage/brick1 mystorage4:/storage/brick1 force
Removing brick(s) can result in data loss. Do you want to Continue? (y/n) y
volume remove-brick commit force: success
[root@mystorage1 ~]# gluster volume start gv2
volume start: gv2: success
[root@mystorage1 ~]# ll /gv2/
total 40000
-rw-r--r-- 1 root root 20480000 Jul 30 02:41 20M.file
-rw-r--r-- 1 root root 20480000 Jul 30 03:13 20M.file1
# 如果误操作删除了后,其实文件还在 /storage/brick1 里面的,加回来就可以了
[root@mystorage1 ~]# gluster volume stop gv2
Stopping volume will make its data inaccessible. Do you want to continue? (y/n) y
volume stop: gv2: success
[root@mystorage1 ~]# gluster volume add-brick gv2 replica 2 mystorage3:/storage/brick1 mystorage4:/storage/brick1 force
volume add-brick: success
[root@mystorage1 ~]# gluster volume info gv2
Volume Name: gv2
Type: Distributed-Replicate
Volume ID: 11928696-263a-4c7a-a155-5115af29221f
Status: Stopped
Number of Bricks: 2 x 2 = 4
Transport-type: tcp
Bricks:
Brick1: mystorage1:/storage/brick2
Brick2: mystorage2:/storage/brick2
Brick3: mystorage3:/storage/brick1
Brick4: mystorage4:/storage/brick1
Options Reconfigured:
performance.readdir-ahead: on
[root@mystorage1 ~]# gluster volume start gv2
volume start: gv2: success
[root@mystorage1 ~]# ll /gv2/ # 文件还在
total 90000
-rw-r--r-- 1 root root 10240000 Jul 30 02:40 10M.file
-rw-r--r-- 1 root root 10240000 Jul 30 03:10 10M.file1
-rw-r--r-- 1 root root 20480000 Jul 30 02:41 20M.file
-rw-r--r-- 1 root root 20480000 Jul 30 03:13 20M.file1
-rw-r--r-- 1 root root 30720000 Jul 30 02:40 30M.file
删除卷
一般会用在命名不规范的时候才会删除1
2
3
4
5
6
7
8
9[root@mystorage1 ~]# umount /gv1
[root@mystorage1 ~]# gluster volume stop gv1
Stopping volume will make its data inaccessible. Do you want to continue? (y/n) y
volume stop: gv1: success
[root@mystorage1 ~]# gluster volume delete gv1
Deleting volume will erase all information about the volume. Do you want to continue? (y/n) y
volume delete: gv1: success
[root@mystorage1 ~]# gluster volume info gv1
Volume gv1 does not exist
遇到的问题
1 NFS rpcbind 没启动1
2
3
4
5
6
7
8
9
10
11
12
13
14
15
16
17
18
19
20
21
22
23
24[root@mystorage3 ~]# mount -o mountproto=tcp -t nfs mystorage1:/gv1 /mnt/
mount.nfs: rpc.statd is not running but is required for remote locking.
mount.nfs: Either use '-o nolock' to keep locks local, or start statd.
mount.nfs: an incorrect mount option was specified
[root@mystorage3 ~]# gluster volume status gv1
Status of volume: gv1
Gluster process TCP Port RDMA Port Online Pid
------------------------------------------------------------------------------
Brick mystorage1:/storage/brick1 49152 0 Y 3839
Brick mystorage2:/storage/brick1 49152 0 Y 3959
NFS Server on localhost N/A N/A N N/A
NFS Server on mystorage1 N/A N/A N N/A
NFS Server on mystorage2 N/A N/A N N/A
NFS Server on mystorage4 N/A N/A N N/A
Task Status of Volume gv1
------------------------------------------------------------------------------
There are no active volume tasks
# 启动 rpcbind,重启 glusterd
[root@mystorage3 ~]# /etc/init.d/rpcbind start
Starting rpcbind: [ OK ]
[root@mystorage3 ~]# /etc/init.d/glusterd restart
Starting glusterd: [ OK ]
2 VMware Workstation 虚拟机在线增加硬盘,CentOS 没有自动识别1
2
3# 使用如下命令,其中 host2 表示新增加的硬盘
echo "- - -" > /sys/class/scsi_host/host2/scan
fdisk -l
3. 构建企业级分布式存储
3.1 硬件要求
一般选择 2U 机型,磁盘 SATA 盘 4TB,如果 IO 要求比较高,可以采购 SSD 固态硬盘。
为了充分保证系统的稳定性和性能,要求所有 glusterfs 服务器硬件配置尽量一致,尤其是硬盘数量和大小。
机器的 RAID 卡需要带电池,缓存越大,性能越好。一般情况下,建议做 RAID 10,如果出于空间要求的考虑,需要做 RAID 5,建议最好能有 1-2 块硬盘的热备盘。
3.2 系统要求和分区划分
系统可以使用 CentOS 6.x x86_64,安装完成后升级到最新版本,安装的时候,不要使用 LV,
建议:/boot 分区 200M,/ 分区 100G,swap 分区和内存一样大小,剩余空间给 gluster 使用,划分单独的硬盘空间。
系统安装软件没有特殊要求,建议除了开发工具和基本的管理软件,其他软件一律不安装。
3.3 网络环境
网络要求全部千兆环境,gluster 服务器至少有 2 块网卡,1 块网卡绑定供 gluster 使用,剩余一块分配管理网络 IP,用于系统管理。
如果有条件购买万兆交换机,服务器配置万兆网卡,存储性能会更好。网络方面如果安全性要求较高,可以多网卡绑定。
跨地区机房配置 Gluster,在中国网络不适用。
3.4 服务器摆放分布
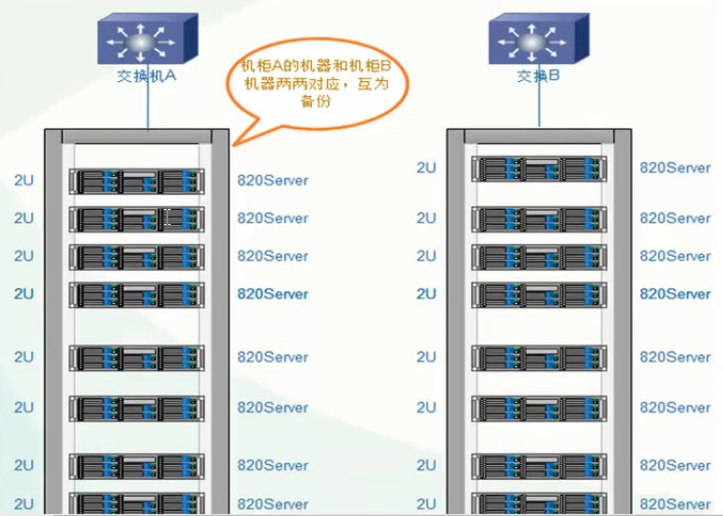
服务器主备机器要放在不同的机柜,连接不同的交换机,即使一个机柜出现问题,还有一份数据正常访问。

3.5 构建高性能、高可用存储
一般在企业中,采用的是分布式复制卷,因为有数据备份,数据相对安全,分布式条带卷目前对 gluster 来说没有完全成熟,存在一定的数据安全风险。
3.5.1 开启防火墙端口
一般在企业应用中 Linux 防火墙是打开的,这些 Gluster 服务器之间访问的端口如下:1
2iptables -I INPUT -p tcp –dport 24007:24011 -j ACCEPT
iptables -I INPUT -p tcp –dport 38465:38485 -j ACCEPT
上面是卷的端口,下面是硬盘的端口,磁盘越多,端口越多
3.5.2 GlusterFS 文件系统优化
| 参数项目 | 说明 | 缺省值 | 合法值 |
|---|---|---|---|
| Auth.allow | IP访问授权 | *(allow all) | IP地址 |
| Cluster.min-free-disk | 剩余磁盘空间阈值 | 10% | 百分比 |
| Cluseer.stripe-block-size | 条带大小 | 128KB | 字节 |
| Netwok.frame-timeout | 请求等待时间 | 1800s | 0-1800 |
| Network.ping-timeout | 客户端等待时间 | 42s | 0-42 |
| Nfs.disabled | 关闭NFS服务 | Off | Off丨on |
| Performance.io-thread-count | IO 线程数 | 16 | 0-65 |
| Performance.cache-refresh-timeout | 缓存校验周期 | 1s | 0-61 |
| Performance.cache-size | 读缓存大小 | 32MB | 字节 |
- Performance.quick-read: 优化读取小文件的性能。
- Performance.read-ahead: 用预读的方式提高读取的性能,有利于应用频繁持续性的访问文件,当应用完成当前数据块读取的时候,下一个数据块就已经准备好了。
- Performance.write-behind: 在写数据时,先写入缓存内,再写入硬盘,以提高写入的性能。
- Performance.io-cache: 缓存已经被读过的
GlusterFS 性能参数调整方法1
gluster volume set <卷> <参数>
1 | [root@mystorage1 ~]# gluster volume set gv2 performance.read-ahead on |
3.6 监控及日常维护
可以使用 Zabbix 自带模板监控 CPU、内存、主机存活、磁盘空间、主机运行时间、系统 Load 等。
日常要注意服务器的监控值,遇到报警要及时处理。
以下大多数功能是针对分布式复制卷执行的。1
2
3
4
5
6
7
8
9
10
11
12
13
14
15
16
17
18
19
20
21
22
23
24
25
26
27
28
29
30
31
32
33
34
35
36
37
38
39
40
41
42
43
44
45
46
47
48
49
50
51
52
53
54
55
56
57
58
59
60
61
gluster volume status gv2
gluster volume heal gv2 full
gluster volume heal gv2 info
gluster volume heal gv2 info healed
gluster volume heal gv2 info heal-failed
gluster volume heal gv2 info split-brain
gluster volume quota gv2 enable
gluster volume quota gv2 disable
gluster volume quota gv2 limit-usage /data 30MB
dd if=/dev/zero bs=1024 count=40000 of=/gv2/data/40M.file
[root@mystorage1 ~]# dd if=/dev/zero bs=1024 count=40000 of=/gv2/data/40M.file
40000+0 records in
40000+0 records out
40960000 bytes (41 MB) copied, 7.53898 s, 5.4 MB/s
[root@mystorage1 ~]# ll /gv2/data/40M.file
-rw-r--r-- 1 root root 40960000 Jul 30 08:09 /gv2/data/40M.file
[root@mystorage1 ~]# dd if=/dev/zero bs=1024 count=80000 of=/gv2/data/80M.file
dd: opening `/gv2/data/80M.file': Disk quota exceeded
gluster volume quota gv2 list
[root@mystorage1 ~]# gluster volume quota gv2 list
Path Hard-limit Soft-limit Used Available Soft-limit exceeded? Hard-limit exceeded?
-------------------------------------------------------------------------------------------------------------------------------
/data 30.0MB 80%(24.0MB) 0Bytes 30.0MB No No
gluster volume quota gv2 list /data
gluster volume set gv2 features.quota-timeout 5
gluster volume quota gv2 remove /data
4. 生产环境常见故障处理
1 | 一般硬盘也要备用几块,因为随着发展,可能这些型号的硬盘不好买到了,一般的事故不会在开始一两年出, |
4.1 硬盘故障
如果底层做了 RAID 配置,有硬件故障,直接更换硬盘,会自动同步数据。
如果没有做 RAID,处理方法如下:
正常节点上执行 gluster volume status,记录故障节点 uuid
执行:getfattr -d -m '.*' /brick 记录 trusted.gluster.volume-id 及 trusted.gfid
以下为故障模拟及修复过程:
在 VMware Workstation 上移除 mystorage1 主机的第三块硬盘(对应 sdc /storage/brick2),相当于硬盘故障1
2
3
4
5
6
7
8
9
10
11
12
13# 系统提示如下:
Message from syslogd@linux-node01 at Jul 30 08:41:46 ...
storage-brick2[5893]: [2016-07-30 00:41:46.729896] M [MSGID: 113075] [posix-helpers.c:1844:posix_health_check_thread_proc] 0-gv2-posix: health-check failed, going down
Message from syslogd@linux-node01 at Jul 30 08:42:16 ...
storage-brick2[5893]: [2016-07-30 00:42:16.730518] M [MSGID: 113075] [posix-helpers.c:1850:posix_health_check_thread_proc] 0-gv2-posix: still alive! -> SIGTERM
# 查看卷状态,mystorage1:/storage/brick2 不在线了,不过这是分布式复制卷,还可以访问另外 brick 上的数据
[root@mystorage1 ~]# gluster volume status gv2
Status of volume: gv2
Gluster process TCP Port RDMA Port Online Pid
------------------------------------------------------------------------------
Brick mystorage1:/storage/brick2 N/A N/A N N/A
在 VMware Workstation 上新增 mystorage1 一块硬盘,相当于更换了新硬盘,下面先格式挂载新硬盘:
1 | mkfs.xfs -f /dev/sdc |
开始手动配置新增硬盘的 gluster 参数1
2
3
4
5
6
7
8
9
10
11
12
13
14
15
16
17
18
19
20
21
22
23
24
25
26
27
28
29
30
31
32
33
34
35
36
37
38
39
40
41
42
43
44
45
46
47
48# 在 mystorage2 是获取 glusterfs 相关参数:
[root@mystorage2 tmp]# getfattr -d -m '.*' /storage/brick2
getfattr: Removing leading '/' from absolute path names
# file: storage/brick2
trusted.gfid=0sAAAAAAAAAAAAAAAAAAAAAQ==
trusted.glusterfs.dht=0sAAAAAQAAAAAAAAAAf////g==
trusted.glusterfs.dht.commithash="3168624641"
trusted.glusterfs.quota.dirty=0sMAA=
trusted.glusterfs.quota.size.1=0sAAAAAATiAAAAAAAAAAAAAwAAAAAAAAAE
trusted.glusterfs.volume-id=0sEZKGliY6THqhVVEVrykiHw==
# 在 mystorage1 上执行配置 glusterfs 参数和上述一样
setfattr -n trusted.gfid -v 0sAAAAAAAAAAAAAAAAAAAAAQ== /storage/brick2
setfattr -n trusted.glusterfs.dht -v 0sAAAAAQAAAAAAAAAAf////g== /storage/brick2
setfattr -n trusted.glusterfs.dht.commithash -v "3168624641" /storage/brick2
setfattr -n trusted.glusterfs.quota.dirty -v 0sMAA= /storage/brick2
setfattr -n trusted.glusterfs.quota.size.1 -v 0sAAAAAATiAAAAAAAAAAAAAwAAAAAAAAAE /storage/brick2
setfattr -n trusted.glusterfs.volume-id -v 0sEZKGliY6THqhVVEVrykiHw== /storage/brick2
[root@mystorage1 ~]# /etc/init.d/glusterd restart
Starting glusterd: [ OK ]
[root@mystorage1 ~]# gluster volume heal gv2 info
Brick mystorage1:/storage/brick2
Status: Connected
Number of entries: 0
Brick mystorage2:/storage/brick2
/data
Status: Connected
Number of entries: 1 # 显示一个条目在修复,自动修复完成后会为 0
Brick mystorage3:/storage/brick1
Status: Connected
Number of entries: 0
Brick mystorage4:/storage/brick1
Status: Connected
Number of entries: 0
# 自动修复同步完成后,查看新硬盘的数据同步过来了
[root@mystorage1 ~]# ll /storage/brick2
total 40012
-rw-r--r-- 2 root root 20480000 Jul 30 02:41 20M.file
-rw-r--r-- 2 root root 20480000 Jul 30 03:13 20M.file1
drwxr-xr-x 2 root root 21 Jul 30 09:14 data
4.2 一台主机故障
一台节点故障的情况包含以下情况:
- 物理故障
- 同时有多块硬盘故障,造成数据丢失
- 系统损坏不可修复
解决方法:
找一台完全一样的机器,至少要保证硬盘数量和大小一致,安装系统,配置和故障机同样的 IP,安装 gluster 软件,
保证配置一样,在其他健康节点上执行命令 gluster peer status,查看故障服务器的 uuid1
2
3
4
5
6
7
8
9
10
11
12
13
14[root@mystorage2 ~]# gluster peer status
Number of Peers: 3
Hostname: mystorage3
Uuid: 36e4c45c-466f-47b0-b829-dcd4a69ca2e7
State: Peer in Cluster (Connected)
Hostname: mystorage4
Uuid: c607f6c2-bdcb-4768-bc82-4bc2243b1b7a
State: Peer in Cluster (Connected)
Hostname: mystorage1
Uuid: 6e6a84af-ac7a-44eb-85c9-50f1f46acef1
State: Peer in Cluster (Disconnected)
修改新加机器的 /var/lib/glusterd/glusterd.info 和 故障机器一样
1 | [root@mystorage1 ~]# cat /var/lib/glusterd/glusterd.info |
在信任存储池中任意节点执行1
gluster volume heal gv2 full
就会自动开始同步,但在同步的时候会影响整个系统的性能。
可以查看状态1
gluster volume heal gv2 info
转载自:https://jaminzhang.github.io/glusterfs/GlusterFS-01-Theory-Basis/